Table of Contents
- What You'll Need Before You Start
- How to Clean Robot Vacuum Brushes: Step-by-Step
- How to Remove Hair From Vacuum Brush Roll Without Damaging It
- Cleaning End Caps, Bearings, and Rubber Extractors
- Washing and Drying: What's Safe to Rinse
- Reassembly and a Quick Performance Check
- Your Robot Vacuum Maintenance Schedule
- Robot Vacuum Brush Replacement Frequency: When to Stop Cleaning
- Frequently Asked Questions
Last Updated: September 18, 2026
What You'll Need Before You Start
Cleaning robot vacuum brushes is the single most effective way to protect suction power and floor coverage between deep cleans. Neglected brushes can quietly kill performance long before a motor ever fails. The fix takes about 15 minutes.
Gather these supplies first:
- Scissors or a seam ripper
- A small cleaning brush or old toothbrush
- A microfiber cloth
- Warm water and mild dish soap
- A flat surface with good lighting
How to Clean Robot Vacuum Brushes: Step-by-Step
The full process takes about 15 minutes and follows four moves: power down, detach, clear debris, and reassemble. Work over a hard floor, not carpet, so fallen debris is easy to sweep up.
Step 1: Power Down and Remove the Dust Bin
Turn the robot off at the main switch, not just the app. Empty the dust bin over a trash can and tap the filter gently to knock loose dust free. A clogged bin forces the brush to work harder, which drains battery and weakens suction.
Step 2: Detach the Brush Roll and Side Brushes
Flip the robot over on your flat surface. Press the release tab on the brush guard and lift the brush roll straight out. Side brushes usually pull off their pivot arm with a gentle upward tug. Never pry with force; if a part resists, check the manual for a hidden clip.
Step 3: Clear Tangled Hair and Debris from the Bristles
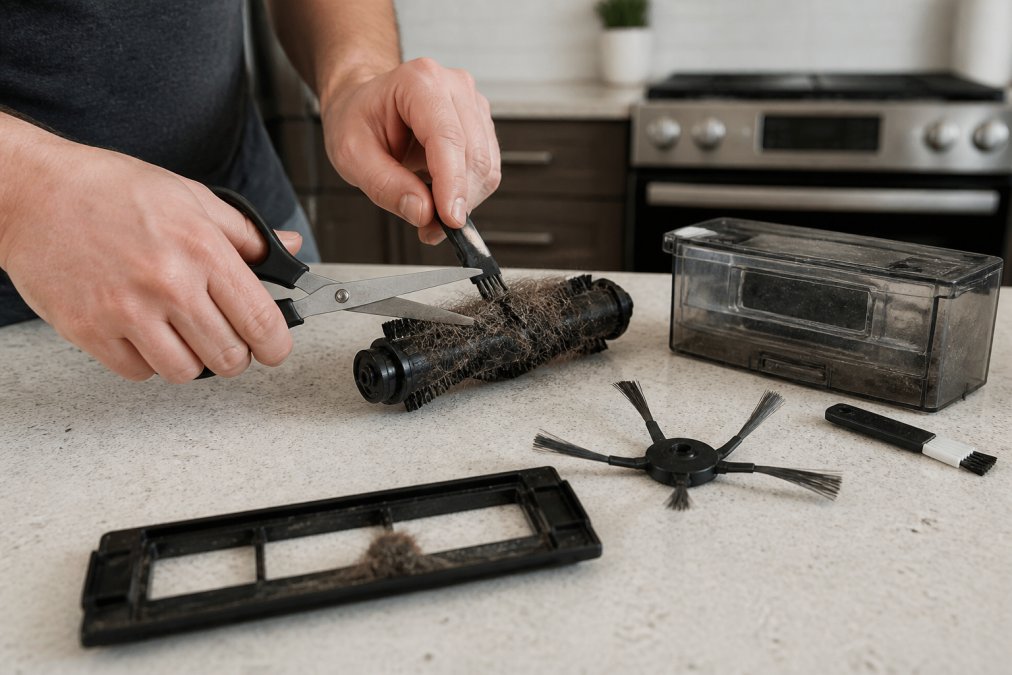
Run your scissors along the brush roll groove and cut through wrapped hair in short sections. Pull the cut strands away from the bristles rather than yanking them sideways. Then brush the side bristles clean with your small brush. This step restores the friction the brush needs to grip debris.
How to Remove Hair From Vacuum Brush Roll Without Damaging It
The safe method is cut, don't pull. Hair wraps tight around a rotating brush, and pulling it sideways bends bristles and stresses the bearing.
Work in this order:
- Cut wrapped hair into short segments with scissors.
- Slide each segment off the end of the roll.
- Pick out remaining fibers with a seam ripper.
- Wipe the roll with a dry cloth.
Cleaning End Caps, Bearings, and Rubber Extractors
End caps and bearings collect fine dust that you cannot see from above. Pop the end caps off if your model allows it, then wipe the bearing surface with a dry cloth. Never soak bearings in water; moisture inside a sealed bearing causes rust and a grinding noise.
| Part | How to Clean | Water Safe? |
|---|---|---|
| Bristle brush roll | Cut hair, brush bristles | Rinse only if washable |
| Rubber extractor | Wipe with damp cloth | No |
| Side brushes | Brush or rinse | Usually yes |
| End caps and bearings | Dry cloth only | No |
| Dust bin and filter | Empty, tap, rinse filter | Filter only |
Washing and Drying: What's Safe to Rinse
Water safety depends on the material, not the part name. Two brushes that look identical on the outside can have completely different tolerances, so match the method to what the brush is made of before it touches a sink.
Sanitizing After Pet Messes or Spills
Cleaning removes debris. Sanitizing addresses what you cannot see. If a brush has picked up pet waste, vomit, or a spilled cleaning product, treat it as contaminated before it goes back on the robot.
- Wear disposable gloves and work over a lined trash can.
- Remove visible matter with a paper towel and discard it immediately.
- Wash rinse-safe parts with warm water and mild soap, then follow with a pet-safe disinfectant wipe or a diluted disinfectant labeled for the surface.
- Let the disinfectant sit for its stated contact time before wiping dry, a quick swipe does not disinfect.
- Dry fully, then wash your hands and wipe down the brush guard and cleaning head, which also contacted the mess.
Drying Rules That Actually Matter
- Shake off excess water and blot with a dry towel.
- Lay parts flat on a towel in open air, bristles up, so water drains away from hubs and caps.
- Allow a full 24 hours (PowerClean®). Damp bristles clump and a damp bearing rusts.
- Never use a hair dryer, oven, or direct sun. Heat warps plastic and softens rubber.
- Reinstall only when every part is dry to the touch, including the underside of the brush guard.
When in doubt about a specific part, check the manufacturer's guidance before rinsing anything, following it also protects your warranty.
Reassembly and a Quick Performance Check
Reassembly is the reverse of disassembly, but the order matters. Seat the brush roll fully into its slot, confirm the end caps click, then press the brush guard until the release tab locks. Side brushes push straight down onto their pivot arm.
- Spin the brush roll by hand; it should turn freely.
- Confirm the dust bin and filter sit flush.
- Run a short test cycle on a hard floor.
- Watch for streaks, rattles, or a change in sound.
Your Robot Vacuum Maintenance Schedule
A maintenance schedule only works if it matches your home. The generic 'weekly check, monthly deep clean' rhythm is a starting point, not a rule. Adjust it based on three variables: how much hair your household sheds, whether you run on carpet or hard floor, and whether you have pets.
| Task | Low-shed, hard floor | Pets or long hair | Carpet-heavy home |
|---|---|---|---|
| Empty dust bin | After each run | After each run | After each run |
| Check brushes for hair | Every 2 weeks | Every run | Weekly |
| Full brush deep clean | Every 6-8 weeks | Monthly | Monthly |
| Wash filter | Every 2-3 months | Monthly | Monthly |
| Inspect bearings and caps | Every 6 months | Every 3 months | Every 3 months |
| Replace side brushes | Every 6-12 months | Every 3-6 months | Every 6 months |
Preventative Maintenance: Stop Tangles Before They Start
The cheapest brush maintenance is the kind you never have to do because the hair never wrapped in the first place. A few habits cut tangle volume noticeably:
- Run a quick pre-pass on high-shed areas. A 30-second sweep of a bathroom or entryway with a broom or a cordless vacuum removes the long strands that wrap worst.
- Keep hair ties and loose threads off the floor. Long strands wrap tighter than short ones and are the hardest to cut free.
- Use the robot's no-go zones or virtual walls around pet beds, litter areas, and anywhere you shed most.
- Run more often, not longer. Two short passes pick up less per run and keep the brush from loading up in a single session.
- Check the brush after every run in shedding season. Seasonal shedding overwhelms a weekly schedule fast.
A Five-Minute Weekly Check
You do not need a full teardown every week. Flip the robot, spin the brush roll by hand, and look for three things: visible hair wraps at the ends, bristles that stay flattened when you run a finger across them, and any change in spin resistance. If all three look clean, you are done. If hair is wrapping the ends, cut it now, hair that sits for weeks works its way into the bearing and turns a two-minute fix into a part replacement.
Robot Vacuum Brush Replacement Frequency: When to Stop Cleaning
Replace brushes when cleaning no longer restores performance. Most brush rolls last several months with regular care, but worn bristles, bent rubber extractors, and noisy bearings are signals to swap parts, not scrub harder.
Watch for these signs:
- Bristles that stay flattened after cleaning
- Rubber extractors with cuts or missing fins
- A bearing that grinds even when clean
- Visible gaps between the brush and the cleaning head
Frequently Asked Questions
How often should I clean my robot vacuum brushes?
Check the brush roll and side brushes weekly, and do a full clean every two to four weeks if you have pets or long hair in the house. Homes with heavy shedding may need it more often. A quick weekly pass keeps tangled hair from wrapping around the bearings, which is the main cause of reduced suction power and uneven floor coverage over time.
Can I wash robot vacuum brushes with water?
Most removable brush rolls and rubber extractors are washable, but check your model's manual first. Rinse with lukewarm water and a drop of mild soap, then let everything air dry for at least 24 hours before reinstalling. Never put a wet brush back in the vacuum, and never submerge the cleaning head, motor, or dust bin, since moisture can damage the electronics.
When is it time to replace robot vacuum brushes instead of cleaning them?
Replace the main brush roll when bristles look flattened, frayed, or bent, or when the rubber extractors show cracks or tears. Side brushes usually need swapping every three to six months, sooner if the bristles splay outward and stop sweeping debris toward the suction path. If cleaning no longer restores pickup performance, replacement is the fix.
Do I need special tools to clean my robot vacuum?
No specialty kit is required. A pair of small scissors, a seam ripper or the cleaning tool that came with your vacuum, a soft dry cloth, and a pair of tweezers handle most jobs. For stubborn tangled hair wound tight around the bearing, a small flathead screwdriver helps lift the end cap so you can pull the debris free without bending the brush.
Robot vacuum brushes wear out quietly, and by the time you notice weak pickup, the damage is often done. WellnessLifeClub74 curates home and pet care essentials built to keep daily routines running smoothly, backed by fast shipping and a commitment to quality. Shop the collection and keep every brush, filter, and replacement part you need in one place.